Hi ladies,
you made a wish,
and it came true ;-)
More exactly, it was a double wish.
First you wanted me to do a tutorial.
Okay, I worked it out on Sunday.
Step by step, with lots of detailed fotos
and in German.
Well, and one day later you wanted to have an english version.
Hm, it's Monday now and I'm a fulltime fashion maker
and the collection must be finished.
Complained about it with my dear creative friend Nicole Kübler from Nick's Tüfftelria.
And heaven sent me an angel
and Nick sent me a wonderful translation of my tutorial. For free. On a silver plate.
She made mee happy. And the bee.
And you, hopefullee.
The bee didn't win the prize,
not even a special mention,
but she gained your hearts
and this is what counts most to me.
And now bee happy with Nick's translation :-)
Thank you so much Nick.
Love you
***

A charming little Bee
A Double Slider Card
For a Voucher
That´s how to make it :-)
1.Base Card

We take a Cardstock Sweet Sugarplum A4 (29,7 cm x 21 cm) upright and cut it 15 cm wide = 21 cm x 15 cm
We score by 1 cm (Glueflap),
by 9.6 cm (Front inner side)
and by 9.5 cm (Backside)
The last section is automatically there (where the slide mechanism is going to be placed)
From the last section you take 2 mm off,
so you make sure that the card closes better.
***
2. On the last section we now cut a slot for the slide mechanism
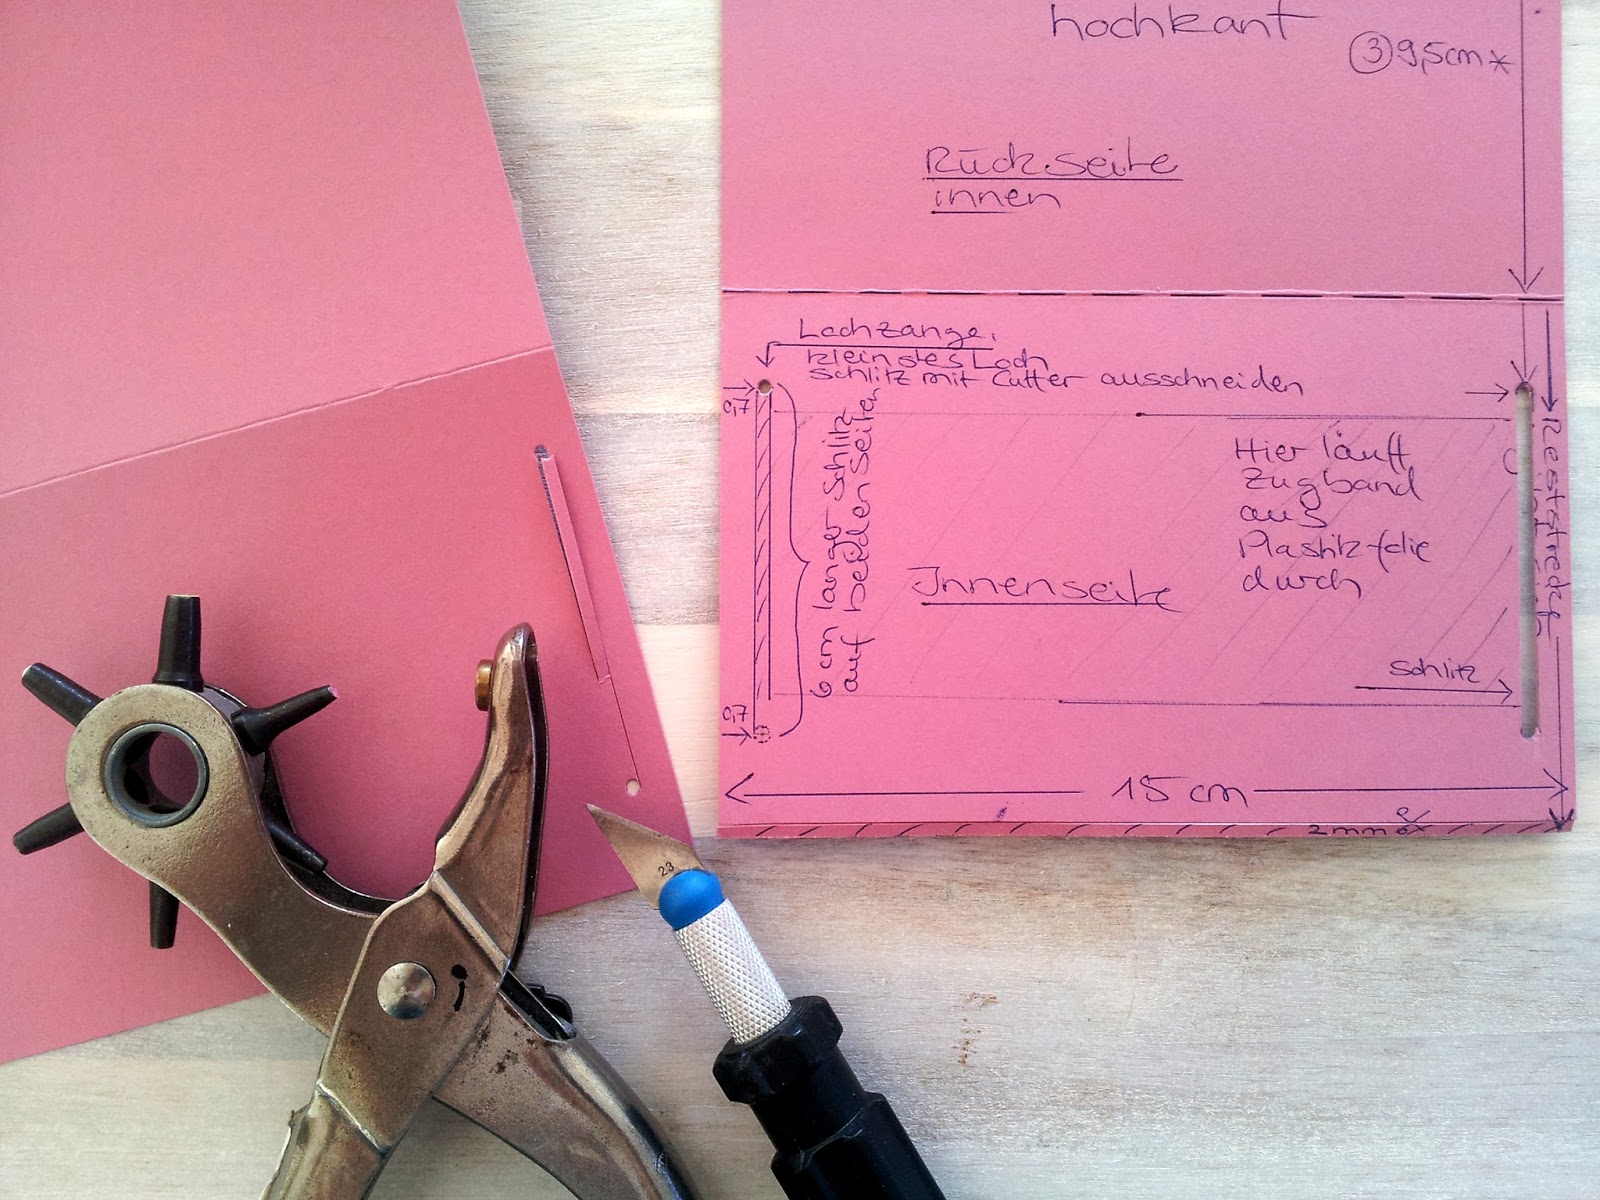
Our slot should be 6 cm long.
The slot should be approx. 0,7 mm away from the edge.
I use a triangle ruler to help me
With the Punch pliers you can make a small whole at the beginning and end of the slot
In-between you can use a cutter knife.
Thats how our slot gets nice endings.
***
3. Slide Mechanism out of Foil

We use what we have at home.
In my case a plastic folder.
We cut it in 5 cm wide stripes (with the other stripes you can make much more of these cards later)

Cut off the white part. Unfold the stripe, and try to soften the score line.
For this it is easier to fold the foil in the opposite direction. The score line could bother you while you slide the card.
So the stripe should have 5 cm x 30 cm.
Place a glue strip at 27.5 cm and 30 cm.
***
4. Placing the slide mechanism

Thread through the slots.

Make sure that the glue stripes are on the right side.
The mechanism will slide more calmly.
***
5. Preparing the Sliding Panels

Cut out of Thick cardstock
Then it more stable and you can handle the card better.
2 x 14.5 cm x 8,5 cm
If you round of the edges it looks more affectionate:-)
Therefore I made myself a template,
with the help of the Envelope Punchboard.
Punch the edges of 2 left over Cardstock pieces and
glue the 2 pieces together so that you get a Double round corner.
Use your template and trace it, after cut it with a manicure scissors. Small edges you can take off with sandpaper.
Colour the edges with the Finger Sponge (I used 2 colours)
1 x with Peekaboo Peach and 1 x with Sweet Sugarplum.
Stamp
the bees, leaves and butterfly on the sides, colour it with the aqua
painter and colour from the inkpad. Again mix the colours.
Colour the Butterfly first with Peekaboo Peach and then small accents in Sweet Sugarplum. Allow some white spots, don´t colour everything.
Watch out: place the objects near the sides, otherwise it could happen
that you don´t see them when you slide the card open.
(My butterfly should not be further to the inner side)

Make a hole in the right Panel for the Strap.
***
6. Place the Panel on the Foil Mechanism

Place the glue strip on the left side of the foil.

Place the panel in the middle.
Now the inner panel.
Here make sure that the stamped side looks in the same direction as the other panel.

Here place the glue strip on the right side

Place the panel in the middle.
***
Now we create the layer card
for the front
Cut layer card 14 cm x 8.5 cm out of normal stamp-cardstock und colour the edges with the finger sponge as the panels.
***
7. Stamp Flowers and Leaves using the Two-Step-Technique and emboss in gold.

Here are the colours I used .
I decided always to work with the second stamp print.
So I make sure that the colour differences are not that
harsh and the Flowers appear more artistic.

Look at the Stamp closely.
On
the left side you can find in the upper edge something like an arrow.
You find it on all the stamps (for the outer and inner life of the
flower).
This is for orientation, it helps you to stamp the inner life on to the right position.

Before
we emboss you need to use the „Embossing –Buddy“, so tap the flower and
the leaves with it. It helps you to shake off the not needed powder,
otherwise you could get stains of gold, where you don’t want them.

For the outline, use the Versa-Mark stamping pad.
Here the small arrow will help us again to find the right position. Love it.
Then spread the Gold Powder. Don´t spare with it.
You shake off the rest which doesn’t stick on to a sheet of paper.
So you can fill the not needed powder back into the container.

The golden outline makes the Flowers more classy and special.
Cut out by hand and place Dimensionals on them.
For one Flower I used 3 mm Pads for the other 2 mm Pads.
***
But before...
...you must check out where you want to position them and mark it with a pencil
then stamp...
8. the Wave
as flight path for our Bee.

Do you see the straight line in the Stamp Set?
This line I have shaped to a wave.
I embossed it,
as also the Greetings.
Here you can see both sets which I used:
Garden in Bloom for the Objects on the card
und Birthday Blooms for the Greetings

Then arrange the leaves and flowers and stick them on.
***
9. The Angle for the strap
We punch it with the Envelope Punchboard

Stick on the layer card in the middle. Now punch it.
***
And now, the „Star“ of our Card:
10. The charming Bee

Stamp it black and colour it with the Aqua painter. I used Peekaboo Peach and Daffodil Delight.
Our bee floats with an invisible magnet.
One part you need to stick on to the Bee.
The other Part you stick onto the right Panel.
But where exactly?

Place the Bee on the Layer card, where you would like it.
Hold it tight. Open up the card and place the magnet there. DONT STICK IT.
The Magnet will do it's work and the counterparts will hold each other and the Bee.
The inner Magnet is not glued down yet.
The Gluespot is still covered and looks at me.

Now pull off the cover of the glue, and fold down the lid to stick on the magnet on the right point.
Don´t
close the card with glue yet - in case you want to change something. For
testing and taking a look you can close the card without Glue.
Here a very important hint for closing:

The glueflap must be around the right panel, otherwise you glue it on to the Panel and it can´t slide.
That was the difficult part ;-)
But the fun you have
and the fun the lucky one has,
when opening the card and playing around with it,
are so much worth the effort.
The lucky one feels the love and the effort you put into it
And that is what counts in life and in everything we do
Have fun by recreating it.
Lovely Regards
your
Conni
from Coco Stella's Ideenhimmel
&
Nick
from Nick's Tüfftelria
Keine Kommentare:
Kommentar veröffentlichen